Sunday, May 29, 2011

GET THE PICTURE or a photo studio on the cheap

I am pretty sure that there are a few of you out there in a similar financial situation, and looking for ways to conserve and/or save money...........get the most for less as it were. I am also sure that there are plenty out there in towns smaller than the one I live in and may not have a professional photographer around to take the image you need.

Fortunately, our town does have a great photographer in it, as do some of the surrounding towns, BUT..... they might not always be open when you need them, or like I said above...........money can be an issue. Well here is a pretty simple and easy way to get the picture when you need.

A good friend of mine ( Joe Vicas ) gave me this tip a few years back and I thought it time to pass it on.

Lights:

These are a pair of painters lights .  I do a lot of our home repair and remodeling of our house and have had them quite a few years, but they are the light source for setting up the photography session. You can get them fairly cheap at any number of stores..........I am not sure but they probably run anywhere from $10 to $15, I think when I got these they were even cheaper than that.

Tripod:


This tripod was my Dad's and I have had it forever.............I am not sure what the run, but you will need one to keep things steady and not have a blurry picture.


I use my easel to hold the image, sort of handy for that sort of thing, but I have taken a marker and written on the side 2 different settings.........one for painting and one for photography, for the picture taking I stet the easel in a more upright position.

There really isn't that much of a difference between the two settings, but believe me......it does make one. If I paint on the photo setting.........the board tends to want to fall over since it is more straight up and down.


You can use several different ways to set your lights up to take the picture, you can get some extending paint poles and have them run from floor to ceiling and clamp your lights on them, or like I have been doing, I sort of use the furniture around me to get them set up:
Do not aim your light directly at the surface of the painting or what ever it is you are photographing....you will get a hot spot or glare. You want to have the light just sort of wash over the area and not really have it hit directly.

Once your lights are set up, put your  camera on the tripod and take the picture. My little digital camera has a little feature on it that allows me to bracket the photos........that is adjust the light/dark to help me get a truer image of the painting. I can go a stop or two above or below and then choose the image that is closest to what is on the easel.
Once I get the image, I go to the computer and do my photo editing in Photoshop..........you will have to use whatever programs you have.........and then I am ready to save it and send it off.


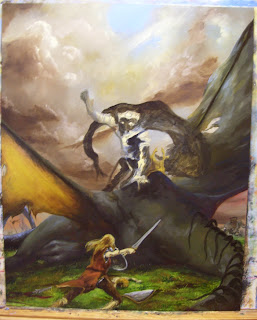
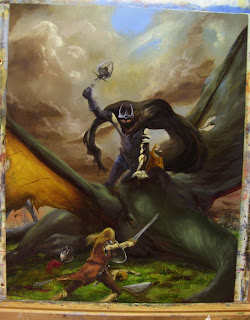
The painting used as an example in this blog is not a finished piece and so I really didn't take the time to set things up properly, but all the images for the past few years have been done this way so for better examples run back thru the blog and take a peak, look at these example 1, example 2, example 3


Wednesday, May 18, 2011

REVELATION .... EOWYN AND THE NAZGUL, part II

In the previous post of  REVELATION .... EOWYN AND THE NAZGUL I had touched on the concepts of the piece and how I arrived at the composition of the painting. Here in this post I will go over a bit of the painting process........if you have been here before, you will have probably seen the 2 part  step-by of how I painted the Zombie Moon painting, if not here are the links Z 1 and Z 2.


Here in this photo is the image drawn/transfered onto the Tracy-nite. At this point I was still playing with the Nazguls arm position. You will also see that the Fell Beast has some really thick hair-like things drooping about its neck, as well as a poorly drawn hand in the foreground. The neck is also leading out of the picture.

After conferring with a good friend and asking for a bit of advice on it, he had said to loose the hand and turn the neck back in to the painting..........which I ended up doing.


In the image to the right you can see I had resolved my arm issue and turned the beasites neck inward helping to keep your attention more focoused towards the center of the painting where the action is. The hand has been painted over in the under painting....although still visible, it is green and reminds me grass goes here.

I have started to paint in the sky as well, but after sending the image on to another friend of mine, he reminded me that there had been a gloom sort of cast over the area making it foggy and what not, so I had to rethink my sky. ............. I personally love doing calm clear skies for battles just as a contrast, all this nastiness going on and its a beautiful day sort of thing.


Here we have the sky taken care of with a bit of gloomy clouds and sort of mimicking the V of the beasts wings as well. The really bright  area in the top of the painting is glare from either the light of my easel or the flash of the camera........not sure anymore which, but not paint.

I have also started to define the grassy area in the foreground, and put in some bits of battle in the distance. The hand at this point is for the most part gone and forgotten. Eowyns pants are starting to emerge as well as more definition of the beast and the lighting of the wing.


Now we have the beast emerging as well as the colours of Eowyns garments. A spear has been added on the ground....there is a battle going on..........you can see young Merry's shield laying about a little better, the wing is getting a wee bit of glow to it and the hairy things on the beasts neck are blocked in.

Eowyns hair is basically in, her shield and sword is blocked in as well, along with the other wing of the beast getting set in and back.


Now the Nagul is being worked on more, the cape has been established along with a lay in of his body, some detail work on the Fell Beast's right ( our left ) wing. A helmet has been added to the mix, some detail to Miss Eowyn, the saddle and some more work on the other wing.


I was COMPLETELY  unhappy with the hairy things on the neck of the beast and decided to paint them out!!! So, here we have the revised neck and the start of the Nazguls mace, but alas the shaft was too short and I wiped it out after this picture was taken.

There has also been a few shadows and highlights added about the piece as I was waiting for paint to dry enough for me to continue on with things.


 Now we have a mace with a longer shaft for better swinging and balance, as well as a more effective reach.

I have added a little black horse like thing to Merry's shield, a sword scabbard to Eowyn, more detaily bits and piece about the place...........more shadows and highlights  popping up here and there, pushing stuff back bringing others out ............


Lots more work to the Nazgul has been done now. I have painted the eyes in and out a couple of times trying to get them to look right for me, a harness like thing is now about the neck of the beast, lots of detaily bits and pieces have gone on in the beasts neck and wing............the arms are now thicker than in the original drawing, some reigns are lying around in the grass, Merry has been worked on as well, his sword is now in the picture, lights and darks have been added again and again, to push and pull things forewards and back.


.......and here we have the final image...........


a little detail brass plate has been added to the collar
of  the beast, the saddle is now complete.........as I looked at the shape of the thing, having horns and all I thought hey, that looks like it can hold the "eye" and decided to put it in there, and a bit of reflection on the neck. As I came up with this, the design was repeated on the brass plate, and the hasp holding his cloak shut as well.

A ring was placed on the hand of the Nazgul......Ring Wraith, .........Lord of the Rings.......etc, Eowyns hair has been finally done, mainly some highlights about the edges, I am sure I have done a few more things to it, but I really can't remember at this point.


Well there you have it the porgression and thoughts behind the image of Eowyn VS the Nazgul.

The painting wass done on 16" X 20" Tracy-nite.

Friday, May 13, 2011

REVELATION .... EOWYN AND THE NAZGUL


Recently Jon over at the ArtOrder posted a challenge for the image of Eowyn fighting the Lord of the Nazgul............great subject and lots of ideas floating about and just an all around really good challenge. So I decided to hop on this and get busy with the idea and come up with an image.

Now that the idea .....the challenge ............was out there the problem was to come up with a composition  for said idea/challenge.  As I kept thinking about it, and going thru the several possibilities of what to paint, cutting the beasts head off, going with Theodin lying there on the ground dying , and so on, it really for me came down to the moment of the reveal..........the Scooby Do moment of the mask or in this case the helmet coming off ....the " I am not a man" moment.

In this challenge the wonderful folks over at Muddy Colors are heavily involved with crits and the judging......this is truly an amazing opportunity to learn something!!

In the sketches you will see that I played around with the fight scene of her and the Nazty fellow, but hit upon the helmet coming off and them about to get it on. 

In this photo, of the first sketch pages in my doodle book for this image, we see several stabs at establishing the fight sequence or moment of battle. The area of the red circle with the # 1 next to it is the initial idea the beginning point of where I started to play. The area with the # 2 is when I hit on the position I wanted for Eowyn.


Here is a closer view of our heroine.


Now that I had my girl, I needed to still find a way to get her and the Nazgul going at it.................

It then came to me to have him coming off the Fell Beast and jumping down on her, and here we can see that sort of happening in the top, and a refinement of the pose for him. Even tho in the text of the story, I believe it says the crown floats above him and that he has no head, I still sort of wanted to indicate him having a cranial region so I used the cape to sort of give that impression.

So now that I have my idea and my composition starting to come together........there is still something not quite right........and it turned out to be the way Eowyn is facing, so I flipped her around and then it was there.......


here is a close up of the little bitty sketch at the bottom right of the page.

Now I have my sketch and my idea I can begin to get it on the board and begin with the painting. I drew Eowyn directly onto the board from a more refined sketch of her that I hit upon while I was doodling away at his weaponry
.....for the Nazgul I then laid a piece tracing paper on the board to work him out after I drew the beast directly on the board as well.


In the next post I will show some of the in progress shots of the painting, but I am going to end here with just the shot of the image drawn onto my board .....