Showing posts with label WET PAINT. Show all posts

Tuesday, April 18, 2017

JUST FOR FUN, I'M NOT LION....

As artists, we spend a lot of time working on our craft, we draw we paint, we sketch we doodle, we work..........but our passion, our love is our work, and at times the fun goes out of it because it is our job. And as it is our job..........we at times loose site of the fact that it should be fun.

So, every once in a while, I will take a day and just draw or paint and enjoy what I do. No worries, no pressures, just doing it because I can. I will do this when we are on vacation or at times in the evening as we wind down for bed, but my favourite place is on our front porch.

Today was just such a day, and today I went out of my comfort zone and painted much much differently than I normally do............I painted Alla Prima.....all in one. 

Normally I work on a painting over several days, underpainting, working on one area while another dries, glazing in areas, painting over things and such....but today I sat down and did the whole thing in one sitting, painting wet on wet.


Here is my board with the drawing on it, it is a little 8 X 10 piece that I had lying about, I couldn't use it for a commercial piece as it had a weird unknown substance on its surface, and I could not risk using it for a client and having the blob of stuff affect the image.


At this point I have reached the ugly stage of painting.......lots of mud and just not looking good at this point. Basically I have blocked in large areas of colour. Normally I would have stopped at this point and let it dry, but since I was going for the all in one sitting thing I kept on going to remove the uglies.


Here we have pushed thru to get a little more work on the piece. He is starting to take on some semblance of a lion and coming out of the ugly stage. He is still a bit muddy but coming out of it. 


Here he is all done and in a little over 3 and a half hours. He is not perfect, a little out of perspective, still a bit muddy, a little cockeyed, but I like him.

It was a blast, I learned a bit that I can apply to my normal studio work, and I will be doing this again. 


My set up for my palette, which is my con palette that I talked a bit about in the last post. I used very few colours on this, yellow ochre, raw sienna, burnt umber, cad yellow light, titanium white, ultramarine blue, cerulean blue, dioxazine purple and cad red deep. 


And here was my company for the afternoon so I didn't get lonely while I painted.........it was sort of like being in the studio as well since he hangs out with me there too.

Monday, March 06, 2017

THE PERFECT PASSAGE


Sometimes when you read, there is a passage that sticks with you, just resonates and sort of speak to you......you get it, and in my case I sort of see it, it is there visually for me. 

For me, when I read, I take visual notes of things to possibly draw,  as I a rereading The HOBBIT again, I came to this part of the book:

" he saw all round him a sea of dark green, ruffled here and there by the breeze; and there were everywhere hundreds of butterflies. "

When I read this again, I immediately sketched out this image:


That very brief passage was for me the perfect amount of description to let my mind go to work. It had all the information needed to move from rough sketch to a more detailed image.

So from the initial rough, I went on to a colour image. The following pictures show the progress to the final piece.........


From here, I will in all honesty move on to doing a full on oil of this image.

This piece is done in Gouache on a piece 9 X 12 Strathmore 400 Series toned paper.


Tuesday, August 05, 2014

STILL HERE AND LOTS GOING ON.......on the easel that is

Just a brief bit today, have lots going on with the paint and some new projects happening down the pike, so those will be mentioned again as more progresses with them, but here is a brief look at what is happening in the studio for now.


.... and as always, please feel free to leave comments and just say ehy

Thursday, November 21, 2013

SANTA 2013, the COOKIE SANTA

here is this years Santa, 2013


prints available 8 X 10, $10.00 a piece, just email me at

tracyflynnart@gmail.com


Sunday, September 08, 2013

DOODLE BOOK COVERS

I had seen a post a while back from James Gurney over on his blog the GURNEY JOURNEY about his sketch books and that he was doing little lettering and painting things on the covers, the post was about lettering or sign painting, I am going to post a link as soon as I can find it..........but after seeing the post, I thought " WOW!! what a great idea " and said to myself " Tracy, you should do something on the fronts of your doodlebooks so that you can sort of tell one black book from another "

Well some time went by, and with that still in the back of my mind, I bought a little acrylic paint set, and sat down with my latest book and since I am in a Barsoomian mood and have been doing a lot of Mars concept pieces, I decided to paint a Banth on the cover. 


The set I bought came in a little plastic case, and I can use the inside cover of the lid as a palette, and the colours are pretty much the same as more core group that I use daily in my oils, so all was a go. 


I have to say that just sitting there in the living room watching the tele and leisurely putting the paint down on this was a total joy, no pressures, no deadline just sort of painting to be painting. 


Monday, July 08, 2013

PALETTE CLEANSE

Not too far back I said that sometimes my favourite part of painting is cleaning off the palette............

Well here is a small example of what I mean:


I did this yesterday morning mainly in one sitting, just playing. Now you may ask yourself what does this have to do with cleaning off your palette, well he was done from paint left over from a couple of days of paint on my palette from another painting that I am working on..........as some of the paint was still viable and wet, I just sketched the face out onto a boar and then started to paint him in with that paint before I scraped down and started back into the other image.   A cleansing of the palette as it were, and not wasting of paint.

Could I go back in and tighten things up more and turn it into a "finished piece, sure I can tighten him up, but for me he is finished, served his purpose and was a good exercise, and to be totally honest, I like him as is.

So the next time you have to scrape down, maybe see if you can lay some more paint down and just play a bit..........it is fun, and sometimes you get something out of it as well besides a clean palette.

Saturday, July 06, 2013

D'ARGON

As you can probably see, I have updated the look and layout of the ol' blog here and in doing so, have added a new header and things, and since "DRAGONS DO EXIST IN MY WORLD" I sort of thought it fitting that there should be one of the old boys at the top.

This not a new painting, I originally did him in 2007, but have done a few minor adjustments for fun and now he is ready for the world at this point.

So here he is in full, D'ARGON......

Wednesday, July 03, 2013

THE CAVERN OF DOOM

Well after a long haul, painting left handed, painting right handed, surgery, recovery a few set backs and such, it is finally finished, THE CAVERN OF DOOM.


A few little details, the paintings is 14 X 18, oils on Tracy-nite and available for purchase if you like, there will also be prints available from my Etsy site as well:

http://www.etsy.com/people/tracyeflynn?ref=si_pr

Monday, February 13, 2012

WATERCOLOURS .......part three

In part two I sort of left off at inking in the hair. As I said in that post, I really do not care to use ink straight out of the bottle/well. There are some cases where I do use it, but for the most part I really prefer to water it down, and build my blacks up in layers.

Layering.............. that is THE key to the way I work. Whether it is pencil, ink or paint, layering is the way to go.

In this photo you will see that I have laid down a basic colour for the tree, it is a bit of the yellow ochre and the sienna as well as the umber.....just sort of woody colours. From here I will continue to build up the colours with layers using the same earthy tones, adding some reds or blues to add warmth and depth to the piece as I continue to work and round it off.

I will also start to add in the greens for the mossy areas of the tree. In these areas I will also be starting to layer in the glow from the fire ball thing in her hand to the tree as well as her hair. In this phase of the painting I will tend to jump around from one area to the another,  allowing  some drying time in between layers of paint. I am using a sort of wet on wet thing and letting colours blend as I paint into an area, but also a more dry technique leaving more of a pure colour as well. Still only having a general over all  mid grad tone to the piece, no real lights or darks.

 
From here on out I pick mix and choose my colours, layering them onto the page until I get to the final image.
Finally on her I added a bit of white acrylics to the fireball thing in her hand to help"brighten" up the area, and a little bit on her waist and shoulder as highlights.

Going back in with the white acrylics, is something that doesn't happen often for me, but actually liked the way the application worked, and will try it again in another piece


Saturday, February 04, 2012

WATERCOLOURS ...... part two

A young female human wizard with black hair who always wears white trimmed in gold.

The above sentence is the description that was given over on ArtOrder for the latest challenge that has been given. It is an extremely open description and leaves everyone plenty of room to play. the sort of description I really kind of like, and when I read it an image immediately popped into my brain and I quickly jotted it down  in the ol' sketchbook.
After I got the pencil down in the book, I went over it with my brush pen establishing some basic darks and such, then with my cheapo watercolour set, hit it up with some colour and with that all done I played with the figure and head a bit before I went on to the real paper and laid it all out.


The next step was the pencil....


.... here in the pencil of the piece you can see where I added a sword coming out from behind her back held in her right hand. After getting it all down in the lead I went in with a sepia toned ink to sort of out line certain areas. I use the sepia instead of a black ink because it is a softer line and does not leave you with the colouring book image...........this is something I learned from looking at Frank Frazetta's watercolours and cartoons. It truly was a brilliant idea and yes I did borrow it from him.


Now that I have all that down I wanted to get started with the colour, but first I needed to do her hair. As the above description said BLACK HAIR, and with that in mind I proceeded to lay in the hair with a black ink. I chose to use ink for her hair because I ultimately want to go back into it with the watercolours and add the glow of the fireball thing in her hand. 


With the ink, I can retain a black as well as dilute it and get some greys out of it. Personally I do not believe in ever using ink straight out of the well, not even on with my dip pen. I will almost always go into my water glass first on either one. I can always make the greys darker by going over them again with the ink, but I cannot make the blacks greyer after putting them on the paper.


Here is a real time video of the hair process being done.


.... and here is a look at the hair after it has been inked


I do know and realize that all this is pretty basic stuff, but it IS the fundamentals that we all seem to fall away from, and basic drawing skills are the true foundation of what we all do. Whether it be in a traditional medium or digital...........you have to have the basics.


Up next will be the colour .......... see y'all then.

Tuesday, August 23, 2011

Dragons

In my world, dragons still exist,...................

Those 6 words are at the top of this page............I was looking at this the other day and realized, except for ol' D'Argon ( that fine beastie of a yellow dragon at the top of the page under the words ), I really don't do many dragons, well that is changing and I am going to be revealing more of those fellows to you as the time goes by, and here is a quick look at  Gadron, a red dragon who lives in a sulfur cave. I hope ya'll enjoy and I'll post more on him later as I get time.....and if not I WILL definitely post the finished piece.


Friday, May 13, 2011

REVELATION .... EOWYN AND THE NAZGUL


Recently Jon over at the ArtOrder posted a challenge for the image of Eowyn fighting the Lord of the Nazgul............great subject and lots of ideas floating about and just an all around really good challenge. So I decided to hop on this and get busy with the idea and come up with an image.

Now that the idea .....the challenge ............was out there the problem was to come up with a composition  for said idea/challenge.  As I kept thinking about it, and going thru the several possibilities of what to paint, cutting the beasts head off, going with Theodin lying there on the ground dying , and so on, it really for me came down to the moment of the reveal..........the Scooby Do moment of the mask or in this case the helmet coming off ....the " I am not a man" moment.

In this challenge the wonderful folks over at Muddy Colors are heavily involved with crits and the judging......this is truly an amazing opportunity to learn something!!

In the sketches you will see that I played around with the fight scene of her and the Nazty fellow, but hit upon the helmet coming off and them about to get it on. 

In this photo, of the first sketch pages in my doodle book for this image, we see several stabs at establishing the fight sequence or moment of battle. The area of the red circle with the # 1 next to it is the initial idea the beginning point of where I started to play. The area with the # 2 is when I hit on the position I wanted for Eowyn.


Here is a closer view of our heroine.


Now that I had my girl, I needed to still find a way to get her and the Nazgul going at it.................

It then came to me to have him coming off the Fell Beast and jumping down on her, and here we can see that sort of happening in the top, and a refinement of the pose for him. Even tho in the text of the story, I believe it says the crown floats above him and that he has no head, I still sort of wanted to indicate him having a cranial region so I used the cape to sort of give that impression.

So now that I have my idea and my composition starting to come together........there is still something not quite right........and it turned out to be the way Eowyn is facing, so I flipped her around and then it was there.......


here is a close up of the little bitty sketch at the bottom right of the page.

Now I have my sketch and my idea I can begin to get it on the board and begin with the painting. I drew Eowyn directly onto the board from a more refined sketch of her that I hit upon while I was doodling away at his weaponry
.....for the Nazgul I then laid a piece tracing paper on the board to work him out after I drew the beast directly on the board as well.


In the next post I will show some of the in progress shots of the painting, but I am going to end here with just the shot of the image drawn onto my board .....


Monday, April 25, 2011

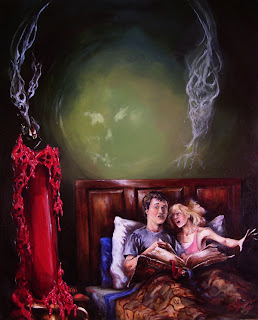
CANDLE COVER


Here is the latest thing off the easel for now, it is a  commission for a project that I will post about later, but for now, here is the painting.

Tuesday, February 08, 2011

ZOMBIFICATION, or the progression of a zombie Part 2

When we left off with the painting in Part 1 I had just finished with the underpainting and gettting all the whiteness off the board. So now we are back at it and into the painting process.....

In this stage I have pretty much completed the sky area of the piece, and established my trees with the highlights of the leaves leading down to our star........the Zombie. The colours of the sky were a mixture of  Sap Green, Ultramarine Blue and Cadmium Red Medium ( to sort of tone down the green ) for the darkest areas, as it fades or lightens I used Cerulean Blue and Cadmium Yellow Light.......this was also the colours of the highlights in the leaves.

In this part of the process I also established the beginnings of the mist for the painting as well as the foundation for the Zombie path.

After getting the sky and trees in I went back to reestablish the moon. With the paint still workable in the sky, I into the moon so I could have a softer edge in some areas and blend it into the sky.  I also started adding some detail to the path, putting some grass along the edges of it and working on the stone pillar on the left had of the image.

The rocks of the pillars are basically a mixture of reds and greens to give me some muddy browns......as well as some Ultramarine Blue for the darker areas.

Next I started in on the Zombie and getting the gate back in, as well as some more mist work.


At this stage of the painting I am now working the entire surface of the painting bringing out and pushing back to bring it all home, but mainly concentrating on the Zombie.


....some Zombie detail....


For the flesh of our Zombie, I wanted it to be a greyish colour but with just a little more "colour", so I made it more of a bluish purple. Some of the shadow and decayed areas are Asphaultum and a little black, and dry brushed on to kind of give a dried out appearence to the flesh. For some of the hair, I took the tip of a very pointy exacto knife and scratched into the paint to get the fine lines of highlights.

...........and here we have the completed Zombie.


Thanks for listening.

Monday, January 24, 2011

NEW YEAR........NEW SERIES

With the advent of the new year, I have decided to embark on a personal project to do in the inbetween times.........I have always sort of wanted to do a project on my favourite movie monster.....sort a Famous Monsters of Filmland thing......those mags had some of the greatest covers and art work. So, with all that in mind, I did this little image of the Phantom to start if off, and will be doing others as time permits, but here we go...................

THE PHANTOM


Sunday, January 02, 2011

HAPPY NEW YEARS

A few years back I was in the habit of doing a watercolour of a Gnome for Christmas, as well as New Years, traditionally I would do them the day of the holiday or maybe a day or 2 in advance.........yes sometimes a day or 2 after as well.


This year I started back again at it, but this time in oils


...this little guy is going to be unique, since he is in oils, and although I do like him, I am going to go back to the watercolours for these, for me there is something about them that I like more, they are I guess for me more charming and I just like the look of them better.